The New Year Is Just Around the Corner.
The new year is coming, and most likely New Year resolutions have been written and goals for the new year have been set. But what happens when the stressers of life begin, and life gets back to normal after a few days into the New Year? We completely abandon those goals and resolutions, or we don't spend as much time on them.
The Daruma Doll might be an effective tool in helping each of us with achieving our goals and keeping us focused to do so.
What is a Daruma DOll?
Daruma is a traditional handmade Japanese wishing doll (or charmingly referred to as a "GOAL DOLL") that keeps us focused on achieving our goals!
The Daruma doll:
- is a concept from Japan
- helps us keep an eye on our dreams
- is a centuries-old tradition
- is positive, motivational, and fun (and it works) !!
A Daruma Doll
During the first few days of January in Japan, millions of people will go to Shinto shrines or Buddhist temples to bring home luck for the new year.
One of the most popular items that is sold this time of the year is the Daruma doll.
Although symbols of luck and good fortune abound in Japan, few can match the popularity of Daruma dolls: papier-mâché figures believed to lead their owners toward success. Darumas, shaped like Bodhidharma and produced around Takasaki in Gunma Prefecture, are an important part of New Year celebrations in Japan, and a deep-rooted Japanese tradition.
What Are Your Goals?
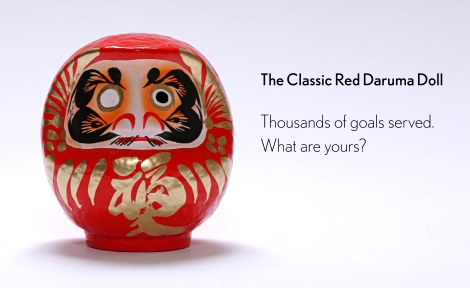
The Ultimate Goal Doll
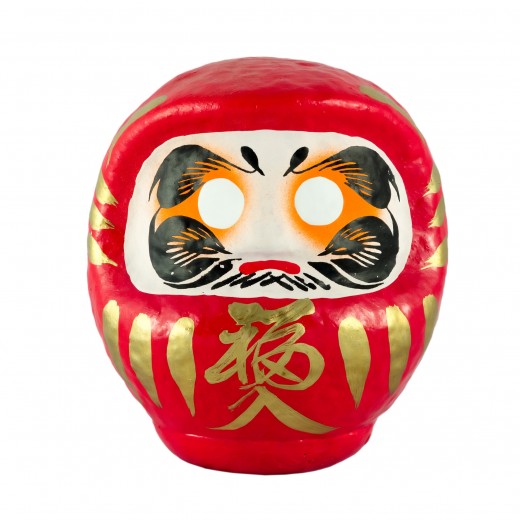
The Japanese daruma doll is quite strange looking. The doll is:
- round
- does not have any legs or arms
- has a mustache and a beard.
- has eyes that consist of only blank round circles.
The daruma doll is very auspicious!
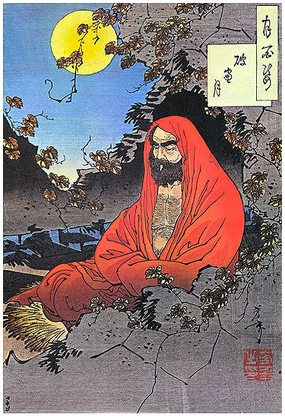
These Japanese dolls are a symbol of Bodhidharma. He is considered the founder of Zen Buddhism in China.

Legends Of Bodhidharma
Bodhidharma lived during the 5th century CE. Most of the stories about this monk are considered legends.
It is told he traveled from Jambudvipa through many countries before reaching China. After having no success in South China, he traveled to North China.
He arrived at Shaolin Monastery. After being denied residence at the monastery, he settled in a nearby cave, where he spent the next nine years meditating and while starring at the wall of the cave. He did not speak the entire time.
The act of sitting in the same position for so many years caused his legs to wither away. That is the reason the daruma dolls have no legs. During the seventh year of his meditation he supposedly fell asleep. This made him furious and he cut off his eyelids to make sure that would not happen again.
According to legend a green tea plant grew from the ground where the eyelid fell. Tea has since then helped monks stay awake for longer periods of time. Some legends tell a story of a student who cut off his arms to prove to Bodhidharma that he was completely devoted to him.
Bodhidharma
What Do You Do With a Daruma Doll?
The idea is that when you receive or purchase a new doll, you need to make a wish or set a goal.
The wish or goal must be measurable and specific. A vague wish will do no good.
Next you need some black ink.
Concentrate on your wish or goal and fill in the right eye using the black ink.
Now place the doll on a high self where you will see it often. Every time you look at the doll, you need to remind yourself of your wish or goal.
When your wish comes true or you have reached your goal, you fill in the left eye with black ink. Many people will write their goal or wish on the back side of the doll when the goal is reached.
Give thanks and show gratitude.
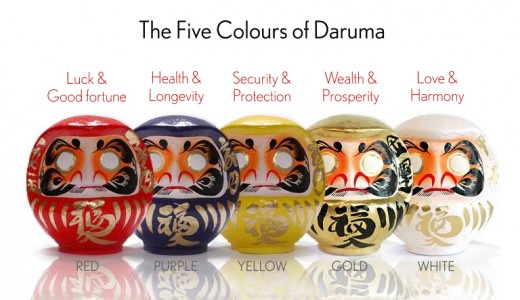
Colors of the Daruma Doll
The tradition color of the daruma doll is red. Red is the color of victory and success. This is the most common color. Red daruma dolls are the ultimate good luck dolls.More colors have shown up lately. The meaning of the colors may vary in different areas.
Purple dolls may be used if the goal is related to health issues and longevity. It is also often preferred if the goal is in a sports category.
Yellow dolls may often be used if the wish is aimed at protection or security of any kind.
White daruma dolls are all about harmony and love. White dolls are great for marriages and a harmonious family life.
Gold dolls obviously are associated with wealth and prosperity. Anyone who has a specific money gold may choose a gold daruma doll.
Black daruma dolls seem strange and work differently from the traditional goal setting dolls.
Black is for protection from bad things happening. An example would be to be safe in traffic for the following year.
So, why not be on the safe side and get the full set of Daruma Dolls.
Fall Down Seven Times, Get Up Eight
The daruma doll is made of paper mache. It is hollow and round-shaped. The doll is weighted at the bottom, and is designed to get back up when it falls, embodying the essence of the famous Japanese proverb—fall down seven times and stand up eight. Thanks to this symbolism, the Daruma is commonly regarded in Japanese society as both a good-luck charm and a constant reminder of one’s goals.
The Japanese word for this is “okiagari”. “Oki” means get up and “agari” means arise.
The daruma doll is therefore extra symbolic for the never giving up on your dreams. It symbolizes:
- the ability to overcome any difficulty
- recovering from any hardships you may encounter on your mission to reach your goal.
The Japanese phrase “Nanakorobi” has a strong connection with the daruma doll. Nanakorobi means “Seven times down, eight times up”.
The eyes of a Daruma are usually blank. After receiving one, the owner fills in one eye when setting a goal, starting a new venture, or making a wish, then paints the other when it has been fulfilled. Modern Daruma take on many forms and colors.
Soccer Player Daruma

Source: Gina Hulse
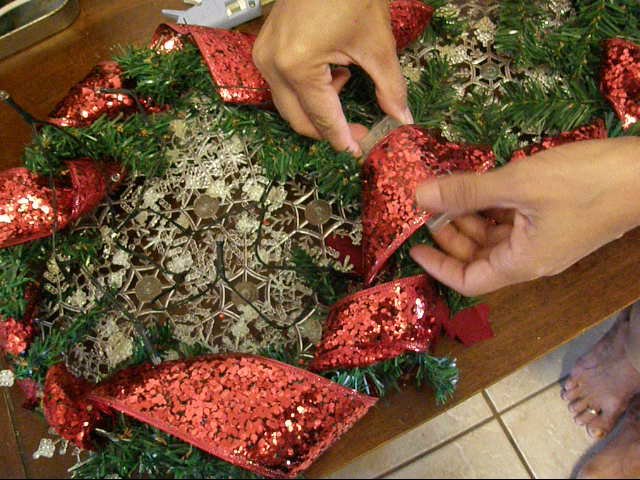
Daruma DIY
Several years ago I taught my Junior High students about the Daruma and the significance in the Japanese culture. Each student made one using their own design.
The lesson was to encourage students to make a Daruma that either related to something that they liked to do, or that of an animal they related to. It was to serve as a reminder to never give up on goals and dreams, and as a symbol of personal courage and perseverance.
The Darumas made by my students were displayed on a stand for an art show. After the show the stand was removed.
Dancer Daruma

Source: Gina Hulse
Materials To Make Your Own Daruma
- Plastic eggs
- Low Temperature Mini Glue Gun
- Large Hex Nut or small rocks to put in bottom of egg
- Masking Tape, 3/4" x 60-yds
- Blick's Mix® Instant Papier Maché,
- Blickrylic® Student Acrylics Assorted color pints
Optional Materials:
- 3M® Production Sandpaper, medium grit
- Craft Menagerie Collage Box
- Liquitex® Acrylic Polymer Gloss Varnish, 8-oz

Step 1
Using a low temperature glue gun, secure a large hex nut in the bottom of each egg. This will provide a balanced weight and keep the egg from falling onto its side.
Allow to cool.
Fishing Daruma

Source: Gina Hulse
Panda Daruma

Source: Gina Hulse
Step 2
Pack scrap paper or cloth as firmly as possible in the top of the egg and around the hex nut in the bottom.
This is done so that if the Daruma is dropped and the hex nut breaks free, it won't move around inside the egg.
Tape the egg closed with masking tape.
Step 3
Make a mixture of one part Blick's Mix to one part water. The mixture should be solid and claylike.
Cover the egg by holding it firmly in both hands and applying a thin, even layer of the mixture.
Set it aside to dry for at least two hours.
Note: drying time may be decreased by placing in a sunny location or in front of a fan.
If desired, once the maché is dry, smooth with small pieces of sandpaper. The bottom of the egg may need extra sanding to make sure it is round.
Musician's Daruma

Source: Gina Hulse
Step 4
Paint the Daruma as a traditional representation of Bodhidharma, as a self-portrait, or as a favorite animal or character.
Acrylic paint will provide the most durable finish, but tempera and watercolors may also be applied to the maché surface.
Step 5
Set those goals and work, work, work until you see them fulfilled.
Here’s to an amazing and fruitful 2018.
One Year Time Limit
In order for a goal to be most effective,it MUST BE
- specific
- measurable
Ideally, it should be a goal that you can achieve within ONE YEAR or EARLIER.
Traditionally the magic powers of the daruma doll will last for one year. If the wish did not come true within the year, the doll may be taken to the temple for burning.
The burning of the daruma doll is a purification process to set the kami free. The kami is the spirit within the daruma.
This absolutely does not indicate a failure or that the owner of the doll has abandoned their wish.
It is rather a renewal of the goal or wish, making sure the wish will be preserved in the next year to come.
The burning of the daruma dolls is a special ceremony performed by the monks in Japan. It is held once a year right after New Year.
A new doll is purchased. The process of filling in one eye while making a wish is repeated.
SUCCESS comes from SETTING GOALS!!
Takasaki
Takasaki in Japan is considered the hometown of the daruma dolls.
Every January there is a huge celebration of the daruma doll at the Shorinzan Daruma Temple. Several hundred thousand people attend this festival every year.
Video
Poll